


Quick
Application Examples: AC Control
Adding control of various AC devices through your Arch Rock Primer Pack embedded network is quite easy. The external device is fairly easy to build and connecting it into your Arch Rock network and putting it to use is even easier. This note illustrates the steps.
Hardware:
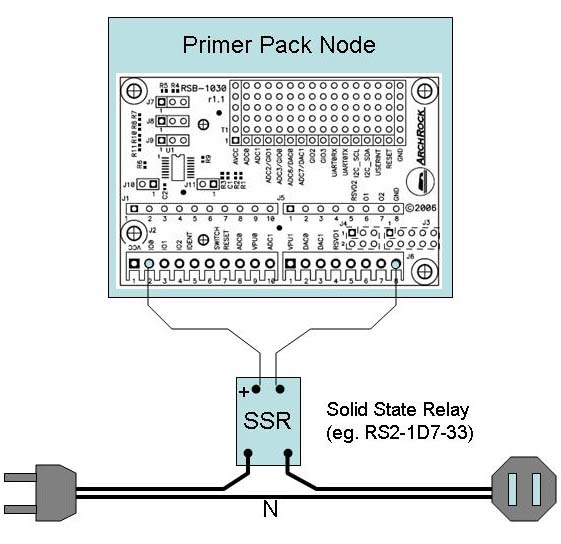
The figure below shows one typical hardware configuration. It uses a Solid State Relay (SSR) to switch on and off the AC current. The SSR should be selected to support the desired AC load. Here we use a device capable of 7A (rms). The control input is supplied from the Arch Rock expansion port. Here, we have connected it to port IO0, but IO1 and IO2 are available. Depending on the choice of SSR, you may need to convert from CMOS levels to the appropriate voltage level. The outputs from the node default to low, so this configuration results in the switch being OPEN be default. Alternatively, connecting the + side to Vcc and the other side to an IO port would default to the CLOSED state.
Web Based Access:
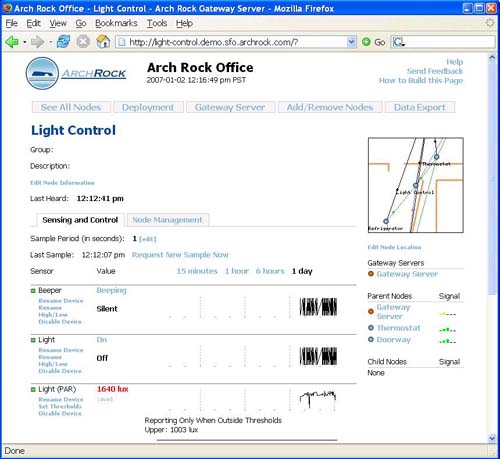
You can configure the node to actuate the relay and perform the actuation from the Node View page for the node that you have attached the hardware to, as shown below. Click the "Enable Device" link for the port to which you attached the SSR. That port will move to the upper list of enable devices, which allows you to name the device so that it is more meaningful to you and name the output states. It shows the current state and a recent time series. Clicking on the output state sets the output to that state. Here, clicking on "On" turns on the light.
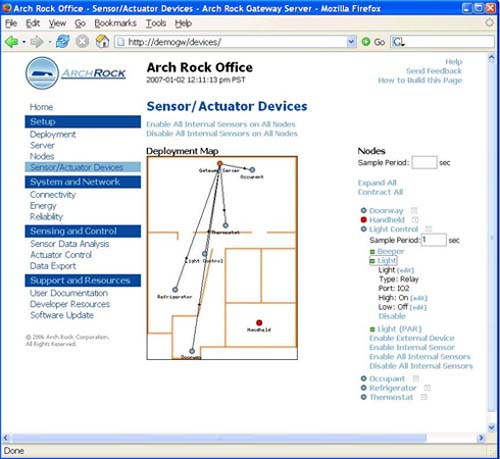
Alternatively, in the network view you can configure the device using the Sensor/Actuator Devices page, as shown below. Here we have attached a relay to port IO2 on the Light Control node. We have also given names to the two output states.
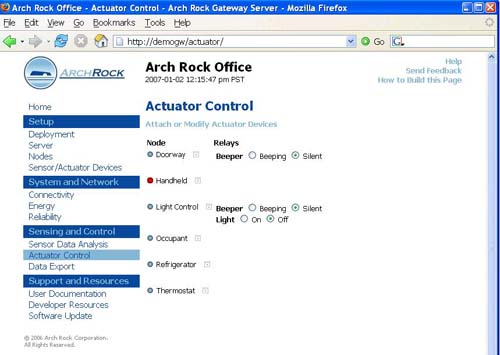
In the network wide view, you can actuate the relay on the Actuator Control page, as shown below.
Web Services:
Now that you have a working actuator from the stock web view, you may be ready to build your own tool at the Web Services level using SOAP or REST.
For example, in the network appliance view the general form of the URL for REST access for a gateway server <HOSTNAME> to node <NODEUID> is as follows.
http://<HOSTNAME>/gw/rest/V1?method=rpc.execute&name=setOutputValue&arg_port=<PORTNUM>&arg_value=<VAL>&addr=<NODEUID>
In our example, the following turns the light ON at the Light Control node.
http://demogw/gw/rest/V1?method=rpc.execute&name=setOutputValue&arg_port=2&arg_value=1&addr=00173b000fed4145
If you have enabled IP addresses for the nodes, the URL is specific to the node. The following turns of the light.
http://light-control.demo.sfo.archrock.com/mote/rest/V1?method=rpc.execute&name=setOutputValue&arg_port=2&arg_value=0
Disclaimor:
This note is for illustrative purposes only. Appropriate engineering practices and approved methods must be utilized when working with household or industrial AC loads. Customers developing devices or systems such as illustrated here do so at their own risk and agree to fully indemnify Arch Rock for any damages resulting from such activities. These products are not designed for use in life support appliances, devices or systems where malfunction of these products can be reasonably expected to result in personal injury.
Adding control of various AC devices through your Arch Rock Primer Pack embedded network is quite easy. The external device is fairly easy to build and connecting it into your Arch Rock network and putting it to use is even easier. This note illustrates the steps.
Hardware:
The figure below shows one typical hardware configuration. It uses a Solid State Relay (SSR) to switch on and off the AC current. The SSR should be selected to support the desired AC load. Here we use a device capable of 7A (rms). The control input is supplied from the Arch Rock expansion port. Here, we have connected it to port IO0, but IO1 and IO2 are available. Depending on the choice of SSR, you may need to convert from CMOS levels to the appropriate voltage level. The outputs from the node default to low, so this configuration results in the switch being OPEN be default. Alternatively, connecting the + side to Vcc and the other side to an IO port would default to the CLOSED state.
Web Based Access:
You can configure the node to actuate the relay and perform the actuation from the Node View page for the node that you have attached the hardware to, as shown below. Click the "Enable Device" link for the port to which you attached the SSR. That port will move to the upper list of enable devices, which allows you to name the device so that it is more meaningful to you and name the output states. It shows the current state and a recent time series. Clicking on the output state sets the output to that state. Here, clicking on "On" turns on the light.
Alternatively, in the network view you can configure the device using the Sensor/Actuator Devices page, as shown below. Here we have attached a relay to port IO2 on the Light Control node. We have also given names to the two output states.
In the network wide view, you can actuate the relay on the Actuator Control page, as shown below.
Web Services:
Now that you have a working actuator from the stock web view, you may be ready to build your own tool at the Web Services level using SOAP or REST.
For example, in the network appliance view the general form of the URL for REST access for a gateway server <HOSTNAME> to node <NODEUID> is as follows.
http://<HOSTNAME>/gw/rest/V1?method=rpc.execute&name=setOutputValue&arg_port=<PORTNUM>&arg_value=<VAL>&addr=<NODEUID>
In our example, the following turns the light ON at the Light Control node.
http://demogw/gw/rest/V1?method=rpc.execute&name=setOutputValue&arg_port=2&arg_value=1&addr=00173b000fed4145
If you have enabled IP addresses for the nodes, the URL is specific to the node. The following turns of the light.
http://light-control.demo.sfo.archrock.com/mote/rest/V1?method=rpc.execute&name=setOutputValue&arg_port=2&arg_value=0
Disclaimor:
This note is for illustrative purposes only. Appropriate engineering practices and approved methods must be utilized when working with household or industrial AC loads. Customers developing devices or systems such as illustrated here do so at their own risk and agree to fully indemnify Arch Rock for any damages resulting from such activities. These products are not designed for use in life support appliances, devices or systems where malfunction of these products can be reasonably expected to result in personal injury.

|
Sensors Magazine: IEEE Computer: Discovery Channel 
|
||||||


| © Arch Rock Corporation 2006, All Rights Reserved. | p: 415.692.0828 | f: 415.278.0441 | info@archrock.com | Terms & Notices |